When I started coming back to the hobby I knew that in some period of time my small desk will starts to get messy and stuff will run free on it. The most random elements where paints and brushes as I bought more and more and still buying.
I decided to buy some rack / stand to help my keep tidy of my paints and brushes. I must say there are some nice and cool looking painters stations but the cost ! I decided that I want to buy miniature and not spend £50 on wood rack even cool one and the cheeper ones where to small for me. So I decided to do my own.
This post is a tutorial on how I achieve it.
Materials
Hard cardboard
Hobby knife
PVA glue
Toilet paper
Duck tape / actually I used green stuff
Paints: Black / White optional Grey
Start
I started my work on doing some sketches on how I see my rack. Then measure the paints, desk and decide how big the rack will be.

When I had everything on paper and in my head I took the cardboard and started to cutting. I have a lot of cardboards after moving to new flat.
The time was vital and I wanted to get rid off not necessary work so I cut the stuff “more or less” to do the shape that I wanted – let say the Ork Chooopa way. Only the first element was measure rest I just stick one element to card board and marked lines. I knew that the construction will not be perfect but had a solution to fix that.

Additionally I hallow holes in the card board to join the pieces together.
Assembling
With all the parts cut out I started joining them together to make basic construction of the rack.


The rack wasn’t 100% stable as my cutting of elements also wasn’t perfect I had to help myself with some stabiliser. I had some green stuff that I stick in important places of the rack to hold parts together. Probably it would be easier to use a tape. But anyway my rack finally started to getting the correct shape.

Additionally I wanted to have place to put my brushes so I took a inside roll from toilet paper cut it in half. One half I stick inside the heights gap that the brushes don’t fell inside and a second I stick to the construction.


First gluing
After having a “stable” standing rack I used a solid layer of PVA glue and spread it across all the elements and wait few hours that the glue try a little bit.

Toilet paper layering
To make a strong and solid layer that will keep my rack together I used water down PVA glue and toilet paper. Layer after layer I but paper sheets to cover all the elements of the rack. i did not cover the place where the paints latter will stand to have smooth base for them. The description how to work with toilet paper is in my tutorial here.

When I was happy and every pice was cover I put away the rack that the glue dry. From time to time I support the drying by using my wife hair dryer but still it took almost 30 hours that the paper was ready for some painting.
Painting
I did not focus on any specific colour schema I knew that the rack will get grey – stone looking colour. Of course for such big construction I did not use Citadels. I went to look for some cheap paints. One time when buying a hobby knife in Reyman I found acrylic paints for 99p. I bought Black / Grey / White. In case of painting black and white will do enough mixing them together to get Grey but having ready grey was good. Later I found in shop near me the same paints in promotion 3 for £2.

After black base I put away the rack for 24 hours that the paint dry. The Grey colour that I bought came out to be to bright so I had to mix it with a little black. I put solid three layers of grey paint to cover my rack.
I was happy with the grey cover so last part was a good and solid dry brush of the whole rack. First I dry brush it heavy with the grey paint that I had.

Second I added a small amount of white to the grey and do a second light dry brush.

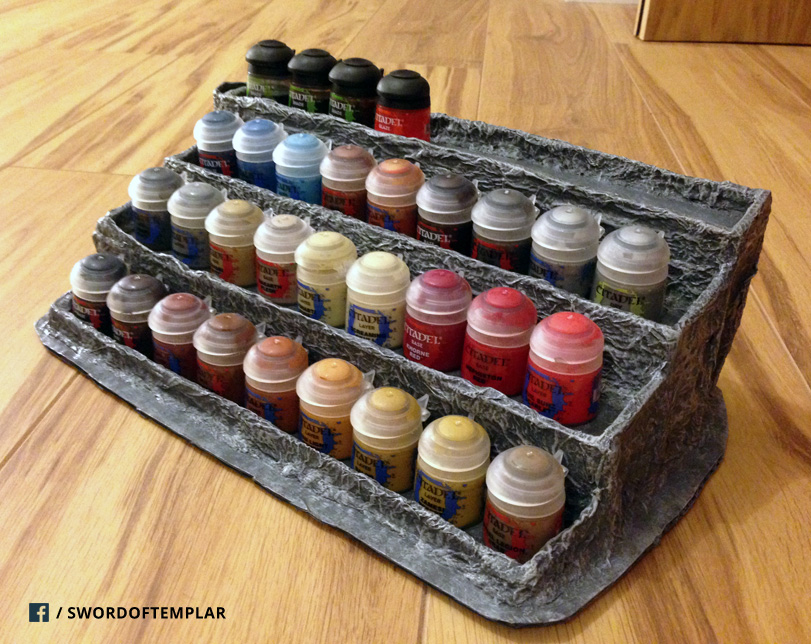
So and there it is my own paints rack.
My messy desk:

My tidy desk:

Hope you enjoy this tutorial. Thanks for comments.
No comments:
Post a Comment